02、创建项目安装依赖
...大约 2 分钟
02、创建项目安装依赖
1、检查 node 版本号不能太低
v16.18.0
2、创建 vue3 项目
因为我是使用 vite 创建的所以后面教程主要针对 vite,webpack 同理
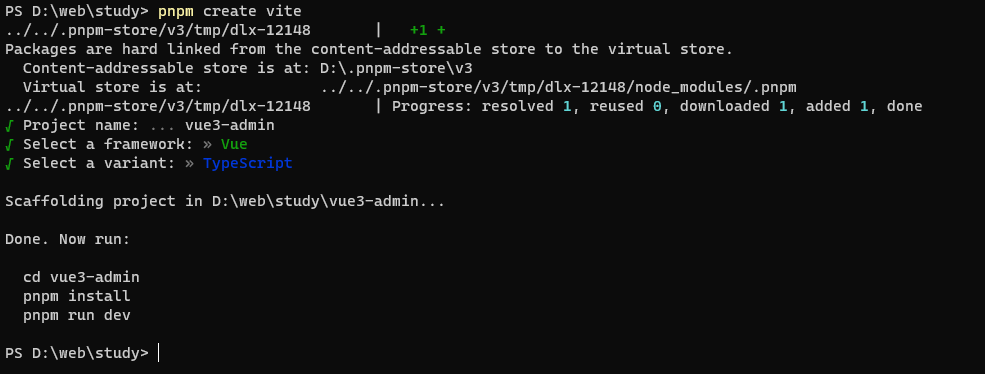
打开cmd输入 pnpm create vite 其他步骤按照图中所示
3、创建成功之后依次输入一下命令
cd vue3-admin  进入创建好的项目
pnpm i   安装依赖
pnpm run dev  运行项目
浏览器打开输入 http://127.0.0.1:5173/就可以看到创建好的项目了
4、安装 vue-route
pnpm install vue-router@4
5、删除无用文件并且编写路由文件
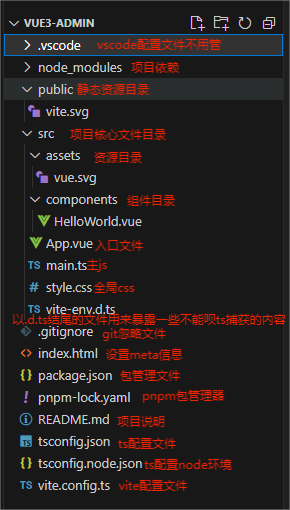
1、删除根目录中 components 文件
2、在根目录新建 views 文件,并且在 views 中新建 index.vue 并写入以下内容
<template>
  <div>首页</div>
</template>

<script lang='ts' setup>
</script>
<style scoped lang='scss'>
</style>
3、在根目录中新建文件夹 router 并且在 router 中新建 index.ts
4、编写 index.ts
import { createRouter, createWebHistory } from "vue-router";

const routes = [
  {
    path: "/",
    name: "/",
    component: () => import("../views/index.vue"),
  },
];

const router = createRouter({
  history: createWebHistory(),
  routes,
});

export default router;
5、在 main.ts 中引入
import { createApp } from "vue";
import App from "./App.vue";
import router from "./router";

createApp(App).use(router).mount("#app");
6、修改 app.vue
<template>
    <router-view></router-view>
</template>

<script lang="ts" setup></script>
<style scoped lang="scss"></style>
7、删除 src 中 stayle.css
6、重启项目就可以看见首页两个字了
7、安装并配置 pinia
1、安装 pinia
pnpm install pinia
2、配置 pinia
1、在 src 目录下新建 store 文件夹并在 store 中新建 index.ts 编写一下内容
import { defineStore } from "pinia";

// useStore 可以是 useUser、useCart 之类的任何东西
// 第一个参数是应用程序中 store 的唯一 id
export const useStore = defineStore("main", {
  // other options...
});
2、在 main.ts 中挂载
import { createApp } from "vue";
import App from "./App.vue";
import router from "./router";
import pinia from "./store/index";

const app = createApp(App);

app.use(router).use(pinia).mount("#app");
8、安装配置 element-plus
1、安装 element-plus
pnpm install element-plus
2、配置 element-plus
9、安装配置 scss
pnpm install sass -d
在 src 目录下新建 style 文件夹,在 style 文件夹中新建 style.scss 文件并写入一下内容
html,
body,
div,
span,
applet,
object,
iframe,
h1,
h2,
h3,
h4,
h5,
h6,
p,
blockquote,
pre,
a,
abbr,
acronym,
address,
big,
cite,
code,
del,
dfn,
em,
img,
ins,
kbd,
q,
s,
samp,
small,
strike,
strong,
sub,
sup,
tt,
var,
b,
u,
i,
center,
dl,
dt,
dd,
ol,
ul,
li,
fieldset,
form,
label,
legend,
// table,
caption,
tbody,
tfoot,
thead,
// tr,
th,
// td,
article,
aside,
canvas,
details,
embed,
figure,
figcaption,
footer,
header,
hgroup,
menu,
nav,
output,
ruby,
section,
summary,
time,
mark,
audio,
video {
  margin: 0;
  padding: 0;
  border: 0;
  font-size: 100%;
  font: inherit;
  vertical-align: baseline;
}

/* HTML5 display-role reset for older browsers */
article,
aside,
details,
figcaption,
figure,
footer,
header,
hgroup,
menu,
nav,
section {
  display: block;
}

body {
  line-height: 1;
}

ol,
ul {
  list-style: none;
}

blockquote,
q {
  quotes: none;
}

blockquote:before,
blockquote:after,
q:before,
q:after {
  content: "";
  content: none;
}

html,
body {
  width: 100%;
  height: 100%;
  font-family: "Helvetica";
}
在 main.ts 中引入即可
import "./style/style.scss";
10、结束语
至此后台搭建准备工作已经完成
Powered by Waline v2.15.8